
The Edit Screen

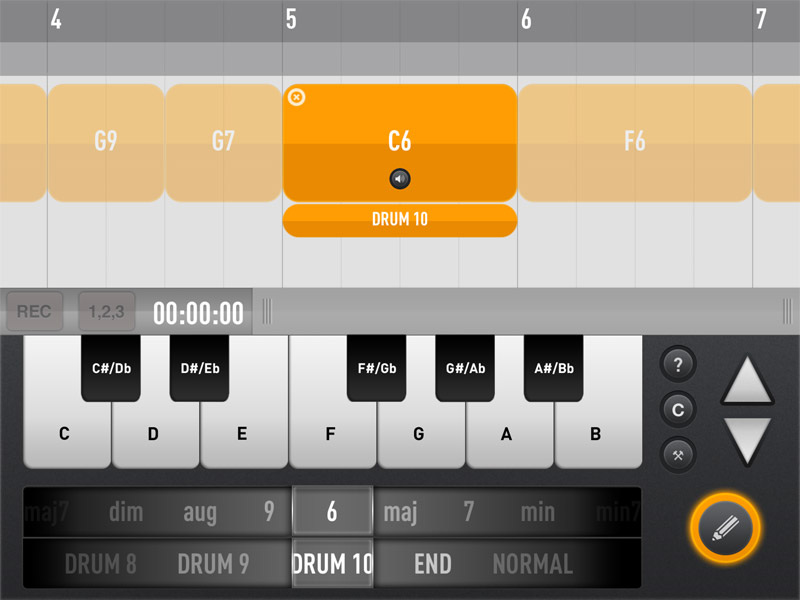
The Edit Screen: SessionBand Ukulele Band Vol.1
Specific functions within the Edit Screen
Adding new chord blocks
Tap to the far right or far left of an existing chord block to bring up the insertion cursor:


Next, choose a chord to insert using the keys on the Piano keyboard for the root note (e.g. C, D, Bb, etc.)…
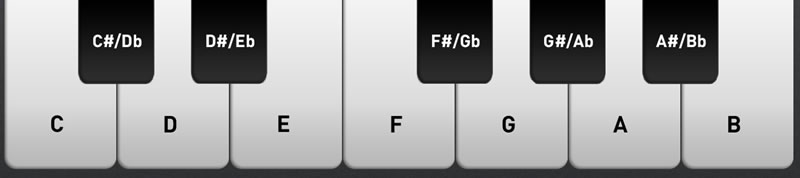
and then rotate the chord variation wheel – directly underneath – to select the particular chord variation (e.g. Cmin, D7, Bbm9).


A default 2 bar coloured chord block representing the chord you have selected will appear in your track and will remain highlighted to allow you to make further changes to it.
You will see that as you make changes via the Piano keyboard and/or the chord variation wheel, the chord information on the coloured chord block will change accordingly.
You can audition the highlighted loop block by tapping on the small grey and white speaker icon. Tap once to hear the selected loop block play once.
When you are happy with the chord you have selected either repeat the exercise to add more chord blocks, resize the block to make it shorter or longer (see below), or tap the lit Edit button to go back to the Play screen.
Tapping a highlighted chord block will de-select it.
The actual chord variations recorded in the studio and included in the app will vary slightly between the different SessionBand apps and depend on the genre: Jazz, Rock, Blues, Country, etc.
Resizing chord blocks to make them shorter or longer
Find the chord block you want to change and tap on it. Other chord blocks (on both sides) will be greyed-out while the chord block you want to change will be highlighted.
Place your finger and thumb onto the coloured chord block itself or the grey area under the chord block, and using a pinching action, shrink or stretch the chord block in 1 beat increments down to a minimum of 1 beat or a maximum 8 beats (i.e. 2 bars for a 4/4 time signature) which is the length of the block when it is initially inserted. When you are happy, tap the Edit button to return to the Play screen.


Changing the chord type in a chord block
Locate the chord block you want to change and tap on it. It will appear highlighted. Use the Piano keyboard to decide on a root note (e.g. C, F, F#, Bb) and then the chord variation wheel to pick a chord variation (eg. C7, Fmin, F#m9, Bbmaj7). You will see that as you make changes via the Piano keyboard and/or the chord variation wheel, the chord description on the coloured chord block will change accordingly. When you are happy with the change, tap the Edit button to return to the Play screen.
Auditioning a new chord block from within your track
To audition a chord block that you have just inserted in the Edit screen, first make sure it is highlighted by tapping on it. Then tap the small audio icon which appears just below the chord description. This will allow you to instantly hear how that chord block will sound with all the instruments playing at the levels that you have set in the Mixer screen.

Deleting chord blocks from a track
To delete a chord block from your track, first make sure you are in the Edit screen. Locate the chord block you want to delete by tapping it. As it becomes highlighted, notice the small ‘x‘ in the top left hand corner of the block. Tap on the ‘x’ and the chord block will disappear from you track and neighbouring chord blocks will automatically close up the gap.
When you are done, tap the Edit button again to return to the Play screen.

Using the Piano keyboard to audition new chords
To try out chords before introducing them as chord blocks into your track, use the Piano keyboard in conjunction with the chord variation wheel below it. You must be in the Edit screen to do this. Auditioning chord types via this method will allow you to hear a simple, sustained version of the chords you select.
Selecting ‘END’ chord blocks
To add a sustained ‘END’ chord into your track for example, at the end of your track, first go to the Edit screen. Tap on the relevant chord block that you want to turn into a sustained ‘END’ chord. Now make sure you resize this chord block to a 1 bar chord block (see A) as ‘END’ chords are only available as 1 bar blocks (see ‘Resizing chord blocks to make them shorter or longer’ above).
Now by rotating the drum selector wheel – which you’ll find below the chord variation wheel – select the ‘END’ setting (see B). A second, much thinner coloured block will now appear below the main coloured chord block to indicate that an ‘END’ chord has been created. To turn an ‘END’ chord back into a normal one, repeat the process but select the ‘NORMAL’ setting on the lower selector wheel. Tap the Edit button to return to the main Play screen.

The ‘END’ option on the lower selector wheel is ‘greyed-out’ (and therefore cannot be selected) until the chord block has first been altered to one bar in length.
Building a track with the ‘Track Builder’ function

To build up a complete linear track quickly use the Track Builder function located within the Edit screen. To use this facility effectively, make sure that you first name/label the different sections of your track in the Play screen (see Naming different sections of your track section for more information). For example: Intro, Verse, Bridge, Chorus, etc…

The Track Builder screen will show all the various sections of your track (so far) in a chronological list:

To copy and paste a section of the track, first highlight the section to be copied by tapping the word ‘Copy’ for that section. Now tap the word ‘Paste’ for the section closest to where you want to copy to. Choose either to paste the copied section ‘above’ (i.e. before) or ‘below’ (i.e. after) the chosen section.
Once you have finished building your track, tap the ‘x’ in the top right hand corner to return to the Play screen.
Please note: If you press the TrackBuilder button and your track doesn’t have any named sections, SessionBand will automatically create a named section called ‘Start’ at bar 1 for you.
Tip: If the track you are creating is likely to involve lots of different repeated sections (eg. verse 1, bridge 1, chorus 1, verse 2, bridge 2, chorus 2, middle 8 etc..), try creating a rough version of each section first. Make sure you name each section and then build up the rough outline track quickly using Track Builder. Now try adding some alternative chord variations at certain points in your track (eg. pre-chorus), and use the automated mixer to add variety to different sections of your track (eg. reducing the volume of some of the instruments in the verse). Then add different drum fills and alternative drum grooves in different sections throughout.
Selecting alternative drum grooves and drum fills
The drum selector wheel below the chord variation selector wheel allows you to alter the drum groove or drum fill associated with the highlighted chord block.
Please note: the number of alternative drum grooves and drum fills depends on the SessionBand app:
- Jazz Vols 1 & 2 and the Original app have 3 fills per track style
- Ukulele Band has 10
- Rock, Blues, Jazz Vol.3, Country, EDM , Deep House and Soul Jazz Funk 1 have 15
- Soul Jazz Funk 2 & 3, Jazz Fusion and Jazz Vol.4 have 20
(Single instrument apps such as Piano Vol.1 and Acoustic Guitar Vols 1 & 2 don’t include any drum loops)
To select a an alternative drum groove or drum fill in place of the default drum groove for that particular style, first make sure you are in the Edit screen and then tap on the relevant chord block in your track that you want to add the new drum pattern to.
The chord block will be highlighted. Now rotate the drum selector wheel (the one under the chord selector wheel) until you find the drum pattern that you want to select. There are 15 alternative drum grooves and fills for each style in the app marked DRUM 1 – DRUM 15 (see note above for differences between the SessionBand apps).
A second, much thinner coloured block will now appear below the main coloured chord block to indicate which drum pattern you have chosen.

To remove an alternative groove or fill from a chord block, first select the chord block and then rotate the drum selector wheel back to ‘NORMAL’.

Crash cymbals
For most of the SessionBand apps, a crash cymbal is automatically applied to your track at the beginning of the bar following the introduction of a drum fill.
Please note: where a drum pattern with a drum fill is introduced (as opposed to an alternative drum groove), a cymbal crash will automatically be applied to your track at the beginning of the following bar.
In the case of the newer apps (SessionBand Soul Jazz Funk 1, 2 & 3, Jazz Fusion and Jazz Vol.4), users can manually insert a choice of cymbal crashes via the cymbal pop-up menu.
First make sure you are in the Edit screen. Tap on the chord block where you want to insert a cymbal crash and then tap the white cymbal icon in the centre of the highlighted chord block. Select one of 3 cymbal crashes from the small pop-up menu. The selected cymbal crash will sound at the beginning of the chord block in your track. To remove a cymbal crash, repeat the process and select ‘OFF’ in the pop-up cymbal menu.

Transposing your entire track
First make sure you are in the Edit screen. To the right of the Piano keyboard are 2 white arrows. Tapping the top arrow will take the chord blocks in the whole of your track upwards in 1 semitone increments. Tapping the bottom arrow will take the chord blocks down in semitones.

Adapting the chord descriptions for Bb or Eb transposition instruments (e.g. Clarinet, Sax)
This feature is for Bb and Eb instrumentalists who require chords to be transposed in order to play along with SessionBand which is itself in ‘concert pitch’ (C).
First make sure you are in the Edit screen to access this feature. To the left of the white arrows, on the right hand side of the screen, you will see a small button which cycles between ‘C’ (default), Bb and Eb when tapped. You will see that the button lights up when either the Bb or Eb option is selected.

Getting back to the Play screen from the Edit screen
To get back to the Play screen from the Edit screen tap the Edit button once.
